
- All
- Product Name
- Product Keyword
- Product Model
- Product Summary
- Product Description
- Multi Field Search
Please Choose Your Language

Views: 0 Author: Site Editor Publish Time: 2026-08-15 Origin: Site


Industrial environments routinely test the limits of infrastructure. Extreme temperatures, corrosive chemicals, and high vibration demand absolute reliability. Stainless steel cable ties operate in critical zones. Failure in these environments is simply not an option. However, installation techniques often fall short. Relying on standard pliers or side-cutters creates immediate risks. These improvised methods lead to inconsistent tension. They frequently damage underlying cables. More critically, they leave hazardous, razor-sharp cut ends exposed.
A purpose-built stainless steel cable tie tool solves these challenges. It ensures verifiable tensioning. It guarantees flush cuts. It supports scalable installation across large sites. This guide provides an evidence-based framework for facility managers and installers. You will learn how to evaluate and select the correct equipment. We cover essential operating procedures. We also detail crucial safety standards tailored for demanding industrial applications.
Safety First: Purpose-built tools provide a flush cut, eliminating the sharp, jagged edges left by standard wire snips.
Tension Control: Predictable, ratcheted tensioning prevents both loose bundling and crushed internal wires.
Application Matching: Tool selection must align with specific tie widths, thickness gauges, and installation volume.
Tool Segregation: Standard nylon zip tie guns lack the blade hardness and mechanical leverage required for metal ties.
Manual pulling fails to achieve the maximum tensile strength of the tie. Installers cannot physically pull metal bands tight enough. This creates a severe risk of bundle slippage. High-vibration environments exacerbate this problem quickly. Unsecured cables begin to vibrate independently. They rub against sharp metal mounting brackets. This continuous friction destroys wire insulation rapidly. Exposed copper wires create catastrophic electrical hazards. Short circuits cause widespread system failures. Proper tooling completely eliminates this specific risk. Ratcheting mechanisms apply massive force effortlessly. They secure the bundle tightly every single time.
Snips leave exposed metal tails pointing outward. These protrusions act exactly like stationary razor blades. They cause severe lacerations to maintenance workers. Deep cuts lead to significant workplace downtime. Bloodborne safety protocols halt production lines entirely. Sharp tails also destroy adjacent wiring systems. Technicians frequently pull new cables through existing trays. New cables snag on these exposed metal edges. The sharp burrs slice through expensive fiber optic jackets. This ruins critical communication networks instantly. Flush cutting prevents these costly accidents completely. Professional tools hide the cut end safely inside the locking head.
High-volume installations demand maximum worker efficiency. Using manual pliers causes rapid operator hand fatigue. Workers experience severe cramping after minimal use. Hand strain drastically slows down project timelines. Scalable operations require proper ergonomic solutions. Dedicated tools multiply human gripping force mechanically. This reduces physical exhaustion significantly. Teams finish large panel builds much faster. Project timelines stay on track consistently. Decreased manual effort improves overall worker morale. Fastening efficiency directly protects your project margins.
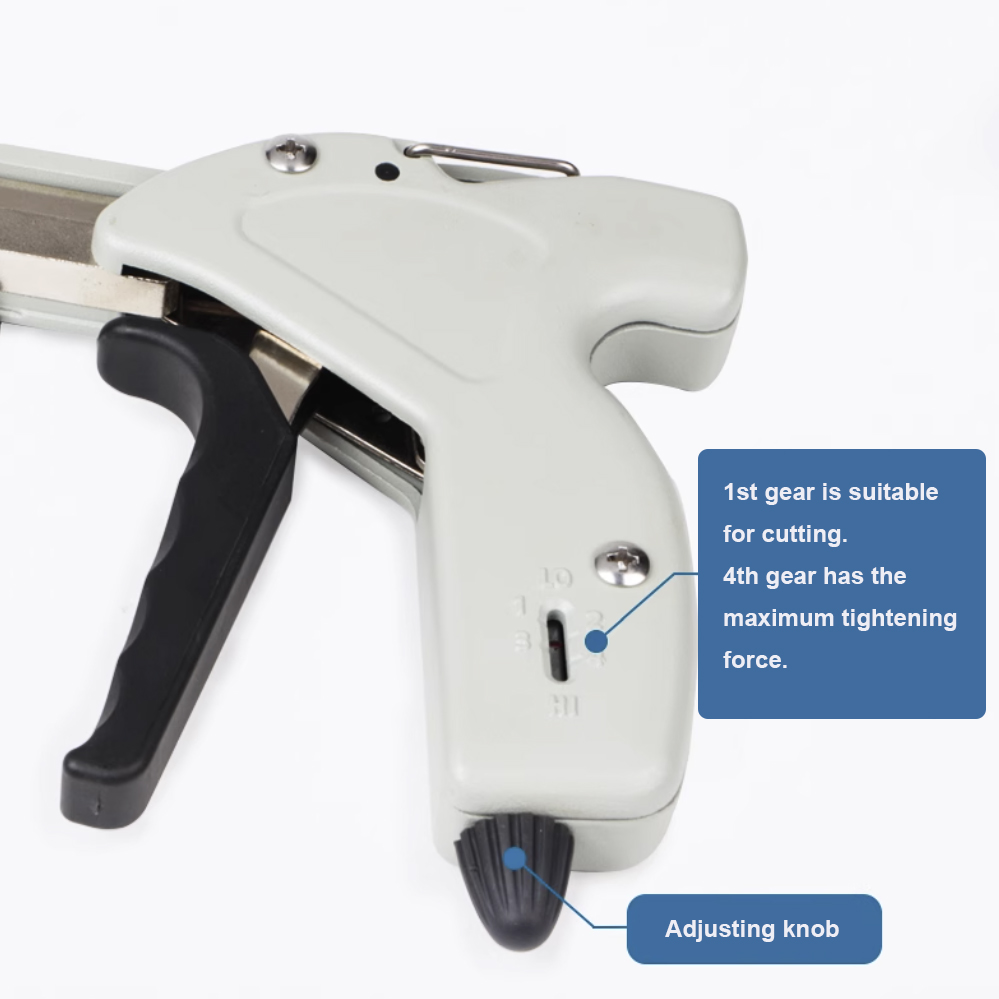
Assess the core mechanism carefully. Tools use either manual pull systems or pre-set ratchets. A reliable metal cable tie tool provides standardized bundling. Predictable tensioning prevents crushed internal wires. It also stops loose bundles from shifting. Force control is non-negotiable for sensitive data cables. Adjusting torque settings gives you complete control. You match the force to the application precisely. Over-tensioning damages delicate sensor wiring. Under-tensioning allows heavy power cables to sag. The right tensioning mechanism balances these extremes perfectly.
Best Practice: Always test your tension setting on a scrap bundle first. Verify the grip strength before proceeding to critical production components.
Evaluate the internal blade mechanism thoroughly. Snapping the tie manually leaves dangerous burrs. An automatic cutting cable tie tool shears the metal flush. It presses directly against the tie head. This ensures absolute zero protrusion. Flush cuts protect your maintenance crew. We strongly advise choosing flush-cut models. They meet strict aerospace and marine safety standards. Look for tools utilizing hardened tool-steel blades. Soft blades dull after just a few dozen cuts. Replaceable blade cartridges extend the tool's usable lifespan significantly.
Industrial tools must survive harsh job sites. Look for drop-forged steel construction. Avoid tools featuring cheap plastic housings. Heavy metal internals withstand daily abuse. They resist damage from accidental drops onto concrete. Also, examine ergonomic trigger designs closely. Comfortable grips reduce repetitive strain injuries. RSI frequently affects professional electricians. A well-balanced tool reduces wrist fatigue significantly. Pay attention to the trigger pull weight. Lighter pull weights keep operators comfortable during ten-hour shifts. Rubberized handles prevent slips in oily marine environments.
Verify acceptable tie width ranges before purchasing. Most tools handle 4.6mm to 12mm widths. Check the maximum metal thickness capacity too. Standard ties measure around 0.25mm thick. Heavy-duty applications require banding thicker than 0.3mm. Basic tools frequently jam on these thicker materials. Thick steel snaps delicate internal ratcheting gears. Review official manufacturer specification sheets thoroughly. Match the tool jaws precisely to your band dimensions. Using incompatible sizes causes uneven tensioning. It also damages the locking ball mechanism permanently.
Width Range: Ensure the nose piece accepts your widest bands.
Thickness Limit: Confirm the internal cutter can shear your chosen gauge.
Material Grade: Verify compatibility with 304 and 316-grade stainless steel.
Mechanism: The operator manually controls tension. They pull a separate lever to cut the tail. The internal gears hold the band tight.
Best For: Low-to-medium volume installations fit perfectly. Maintenance kits often include these reliable units. They suit scenarios requiring highly variable tension. The operator judges the required force visually. A dedicated cable tie tensioning tool offers great flexibility. Plumbers and HVAC technicians prefer this manual control. They secure ductwork and pipes safely. They adapt the tension based on the pipe material instantly.
Mechanism: The operator squeezes a single trigger. The tool ratchets to a pre-set tension. It automatically triggers the cut upon completion.
Best For: High-volume OEM assembly lines require these. Strict compliance environments demand absolute uniformity. This tool guarantees repeatable results constantly. The outcome does not depend on operator skill. Investing in a stainless steel cable tie gun transforms productivity. Shipbuilders and aerospace technicians rely on them. Speed and safety increase simultaneously. You eliminate the guesswork from the assembly floor.
Tool Category | Tension Control Type | Cutting Mechanism | Ideal Operating Environment |
|---|---|---|---|
Manual Tension Tool | Operator judged based on feel | Separate secondary lever action | Low-volume maintenance, field repair kits |
Automatic Ratchet Gun | Pre-set mechanical torque | Automatic flush shear at tension | High-volume assembly, OEM manufacturing |
Step 1: Initial Threading
Loop the stainless steel tie around the bundle. Pull the tail through the self-locking head manually. Make it snug by hand first.
Best Practice: Wear protective cut-resistant gloves during initial handling.
Common Mistake: Twisting the band during insertion damages the internal locking ball permanently.
Step 2: Tool Engagement
Insert the exposed tail into the side slot. Push the tool's nose flush against the tie head. Keep your grip firm.
Best Practice: Maintain a strict 90-degree angle relative to the tie head.
Common Mistake: Tilting the tool sideways causes uneven blade engagement and jagged cuts.
Step 3: Tensioning
Squeeze the main handle repeatedly. Ratchet the tie to the desired tension. Do not crush the bundle contents.
Best Practice: Use slow, deliberate squeezes to engage the internal teeth fully.
Common Mistake: Rushing the ratcheting process skips gear teeth and loosens the band.
Step 4: Executing the Cut
Depending on your tool type, finish the job. Engage the secondary cutting lever firmly. Alternatively, allow the automatic mechanism to shear the tail cleanly.
Best Practice: Keep steady forward pressure against the tie head during the cut.
Common Mistake: Pulling the tool away prematurely leaves a dangerous metal burr behind.
Step 5: Inspection
Run a gloved finger over the cut. Verify a flush, snag-free finish. Check the overall bundle stability.
Best Practice: Visually confirm the locking ball remains seated correctly inside the head.
Common Mistake: Skipping post-installation safety checks entirely leads to undetected hazards.
Nylon tools use softer blade alloys. They handle pliable plastic easily. They fail instantly against 304 or 316-grade stainless steel. Metal bands will chip or break standard blades. Using the wrong tool ruins the cutter immediately. You must match the blade hardness to the material. Hardened tool steel manages metal ties flawlessly. Plastic-rated blades shatter under metallic resistance.
Plastic tie guns lack sufficient mechanical leverage. They cannot generate adequate tensioning force. Their internal plastic gears strip under heavy loads. Metal ties require serious torque for proper installation. Nylon tools simply lack this internal strength. You cannot physically tighten a steel band using polymer internals. The internal springs will snap instantly. The tool becomes useless trash.
Never use a nylon tie gun for metal ties. This improper use immediately voids tool warranties. It also results in dangerous, loose installations. Always segregate your installation equipment clearly. Color-code your tools to prevent workplace mix-ups. Educate your entire workforce on proper tool selection. Strict segregation ensures safety and extends equipment life.
Summarize your evaluation framework logically. Select tools based on tension repeatability. Prioritize flush-cut safety requirements always. Match the tool to your expected installation volume. Evaluate ergonomic features to protect your workers. A proper tool increases efficiency while minimizing safety liabilities.
Audit your current tie specifications thoroughly. Check width and thickness ratings carefully. Ensure hardware compatibility before standardizing new tools. Uniform equipment protects your entire workforce. Standardizing prevents cross-contamination between plastic and metal operations. It streamlines your maintenance procedures perfectly.
Review manufacturer specification sheets in detail. Consider requesting a demo unit soon. High-volume procurement requires hands-on evaluation. Test the ergonomics before committing budget. Proper equipment investment yields immediate safety dividends.
A: No. Wire cutters leave a dangerously sharp edge protruding from the head. A dedicated tool shears the metal flush inside the housing.
A: Most standard tools accommodate widths up to 7.9mm (0.31 inches) or 12mm (0.47 inches), but heavy-duty industrial models are required for banding thicker than 0.3mm. Always check the tool's spec sheet.
A: Yes. Even hardened steel blades wear down over time. Professional-grade tools offer replaceable blade cartridges to extend the tool's lifespan.
A: This usually happens if the nose of the tool is not pressed firmly and squarely against the tie head during the cutting phase, or if the internal blade is worn.


